BLE is intended for light duty cycle devices that support small data throughput and operate a long time on a coin-sized battery. BLE is not only standardized, but will also inhabit over 2 billion cell phones, which will have regular Bluetooth and it smaller brother, Bluetooth LE. A BLE device may operate in different modes depending on required functionality. The main modes of operation are called the advertising mode, scanning mode, master device, and slave device. In advertising mode, the BLE device periodically transmits advertising information and may respond with more information upon request from other devices. The scanner device, on the other hand, listens advertising information transmitted by other devices and may request additional information if active scan mode is enabled. In order to establish a connection, one device has to be in advertising mode (and allow for a connection) and the other device in Initiator mode. It is similar to the scanner mode but with the intention to establish a connection. The initiator scans for a desirable device-advertising packet and consequently sends a connection request. Once a connection is established, the initiator assumes the role of master device and the advertiser becomes a Slave device. Slave devices may have only one connection at a time, while master devices may have multiple connections with different slave devices simultaneously. This asymmetrical approach allows slave devices to be very small in the sense of resources and hardware cost. Such a combination perfectly fits BLE's application paradigm. The master device in this case is most likely a cell phone that has ultimately more computation power compared to a sensor and may support a number of connections simultaneously with slave devices. Find out more here.
The module
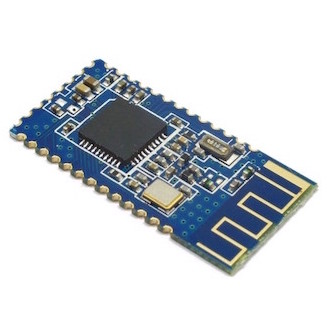
Fig. 1: HM-10 Bluetooth module from JNHuaMao, based on the CC2540 TI chip.
The HM-10 is a readily available Bluetooth 4.0 module based on the Texas Instruments CC2540 or CC2541 Bluetooth low energy (BLE) System on Chip (SoC). The module design and firmware originated from the Jinan Huamao Technology Company (JNHuaMao), but is sold by various suppliers.
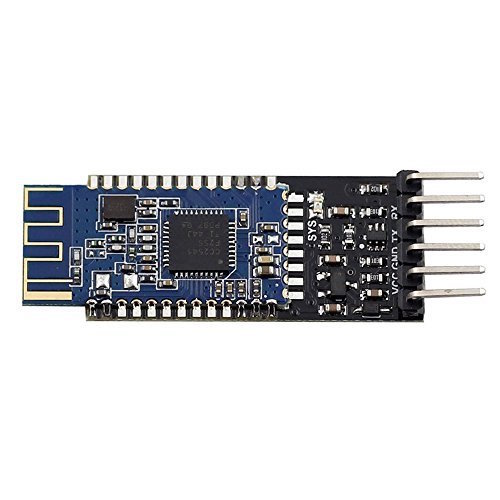
Fig. 2: The breakout board for HM-10 ordered from Amazon.
For the class, we got the HM-10 shipped on a breakout board for easier integration with your projects. If you want to make your own breakout board, look into some examples here. As you can see on Fig. 2, the board provides connections for the supply (VCC, GND) and communication (RX,TX) with the HM-10 module.
Datasheet Highlights
It is good practice to read the datasheet yourself before playing with the device, but I have highlighted here some facts for quick reference.
The HM-10 is rated to operate at a supply voltage of 2.0 to 3.7 volts, and its I/O are 3.3V tolerant!
HM-10, 11 and 12 all use TI's BLE4.0 CC2540 chip. You can find more info here.
To put the device in sleep mode: send AT+SLEEP. To wake up from sleep mode, you can send a long string (>80 characters).
Usage: Query the native MAC address Should return: OK + LADD: MAC address (address for 12 string)
AT+BAUD?
Usage: Query the baud rate Should return: OK + Get: [para1] Details: Scope of para1:0 ~ 8. The parameters corresponding to: 0 represents 9600, 1, 2, 9600, 38400, on behalf of the representative representative of 57600, 115200, 5, 4800, 6, 7 represents 1200, 1200 2400. The default baud rate is 9600.
AT+BAUD[para1]
Usage: Set the baud rate Should return: OK+Set:[para1] Details: Scope of para1:0 ~ 8. The parameters corresponding to: 0 represents 9600, 1, 2, 9600, 38400, on behalf of the representative representative of 57600, 115200, 5, 4800, 6, 7 represents 1200, 1200 2400. The default baud rate is 9600. Note: If you switch to the 1200, module will no longer support the configurations of the AT command, and press the PIO0 under standby, module can restore the factory Settings.Do not recommend using the baud rate.After setting the baud rate, modules should be on electricity, anew set parameters can take effect.
AT+CON[para1]
Usage: Connect to the bluetooth address specified (para1) Should return: OK+CONN[para2] Details: Para2 is the range of the connection and can be A, E or FE. Example: To connect to bluetooth address 0017EA0943AE: sending the AT + CON0017EA0943AE, module returns: OK + CONNA or OK + + CONNF CONNE or OK.
AT+CLEAR
Usage: Removal of equipment matching information Should return: OK + CLEAR Details: Clear success had connected device address code information.
AT+MODE?
Usage:Query module working mode Should return: OK + Get: [para] Details: The range of [para] is 0 ~ 2. 0 represents passthrough mode, on behalf of the PIO acquisition + remote control + 1 passthrough, 2 representative passthrough + remote control mode.The default is 0.
AT + MODE [para]
Usage:Set module working mode Should return: OK + Set: [para] Details: The range of [para] is 0 ~ 2. 0 represents passthrough mode, on behalf of the PIO acquisition + remote control + 1 passthrough, 2 representative passthrough + remote control mode.The default is 0.
AT + NAME?
Usage:Query device name Should return: OK + NAME [para1]
AT + NAME [para1]
Usage:Set the device name Should return: OK + Set: [para1] Note: After the execution of the instruction, required to restart in order to set the parameters of the approval. Example: Set the device name to Seeed, sending the AT + NAMESeeed, return OK + Set: Seeed AT this time, the name of the bluetooth module has been changed to Seeed.
AT + PASS?
Usage:Query pairing password. Should return: K + PASS: [para1] Details: Para1 range is 000000 ~ 999999, the default is 000000.
AT + PASS [para1]
Usage:Set pairing password. Should return: OK + Set: [para1]
AT + RENEW
Usage:Restore factory default settings Should return: OK + RENEW Details: Restore the default factory settings for the module. Ensure a delay of 500 ms after the restart. Note: For some reason the datasheet says: "If no need, please be careful".
AT + RESET
Usage:Reset the module. Should return: OK + RESET Note: After the instruction execution module will have a delay of 500 ms.
AT + ROLE [para1]
Usage:Set the master-slave mode Should return: OK + Set: [para1] Details: Para1 can be
AT+SLEEP
Usage:Set the device in sleep mode. Should return: OK+SLEEP Details: To wake up, send a large (>80 characters) string.
There are more AT commands, look for them in the datasheet!
Demo
Initial Testing of the device
This is a first attempt I had communicating with the module, and I can say I enjoyed it a lot (see video above)! It was found out by and succesfully connected with the iPhone immediately. I was able to do fully transparent Rx/Tx communication with a Serial terminal in my laptop, and at the same time send AT commands to control the settings! Here is a step by step walkthrough, which I urge you to follow right before starting interfacing it with an MCU, in order to get a hang out of all the AT commands (check above) and responses:
Connect the breakout board to your laptop using an FTDI cable. Note that the pinout of the breakout board does not match the FTDI cable so you have to use intermediate cable to route it correctly.
Fig. 3: Connection wiring between HM-100 breakout board and FTDI cables.
Download an application on your laptop/phone to be able to send/receive strings from a BLE4.0 device. Here are some examples that work for me:
Power on the module (i.e plug in the FTDI cable) and look for it on the app you downloaded! You should be able to see and connect to a device named HMSoft. Note: You have to turn on Bluetooth in your device for this to work.
Send and receive strings from your phone application to serial terminal! Check video for demo.
Using the serial terminal, send AT commands and see the incoming responses. Do that until you feel comfortable with all of them, and note the time delay for each response. In the next step, you will have to program your MCU to send this commands!
Hello World!
Fig. 4: Hello worlds bluetooth communication demo!
Noodles & Company is an American fast-casual restaurant that offers international and American noodle dishes and pasta in addition to soups and salads. Noodles & Company was founded in 1995 by Aaron Kennedy and is headquartered in Broomfield, Colorado. The company went public in 2013 and recorded a $457 million revenue in 2017.In late 2018, there were 460 Noodles & Company locations across 29 states and Washington, D.C.


 Français
 Deutsch
 Pусский


Customer questions & answers
Customer reviews
4.8 out of 5